
## How to Paint an Eye with Acrylics: A Comprehensive Guide to Mastering the Art
Painting realistic eyes with acrylics can seem daunting, but with the right techniques and a little practice, you can create stunningly lifelike portraits. This comprehensive guide will walk you through every step of the process, from selecting the right materials to mastering advanced shading techniques. We’ll explore the nuances of capturing the subtle details that make an eye truly captivating, and provide you with the knowledge and confidence to elevate your acrylic painting skills. Whether you’re a beginner or an experienced artist, this guide offers invaluable insights into the art of painting eyes with acrylics. Learning how to paint an eye with acrylics requires patience, understanding of anatomy, and a willingness to experiment. This guide aims to provide you with all of that and more.
### What You’ll Gain From This Guide:
* A step-by-step approach to painting realistic eyes with acrylics.
* Expert tips on selecting the right materials and tools.
* Techniques for achieving accurate proportions and shapes.
* Guidance on mastering color mixing and shading.
* Insights into capturing the subtle details that bring an eye to life.
* Confidence to create captivating portraits with expressive eyes.
## Understanding the Anatomy of the Eye for Artists
Before diving into the painting process, it’s crucial to understand the basic anatomy of the eye. This knowledge will help you create more realistic and believable depictions. The eye isn’t just a simple sphere; it’s a complex structure with various components that contribute to its overall appearance.
### Key Anatomical Features:
* **The Eyeball:** The main sphere of the eye, partly hidden within the eye socket.
* **The Iris:** The colored part of the eye, containing the pupil.
* **The Pupil:** The black center of the eye, which controls the amount of light entering.
* **The Sclera:** The white part of the eye.
* **The Eyelids:** The upper and lower folds of skin that protect the eye.
* **The Eyelashes:** Hairs that grow along the edges of the eyelids.
* **The Lacrimal Caruncle:** The small, pinkish area in the inner corner of the eye.
Understanding how these elements interact with light and shadow is crucial when learning how to paint an eye with acrylics.
## Essential Materials for Painting Eyes with Acrylics
Choosing the right materials is essential for achieving the best results when painting eyes with acrylics. Here’s a list of the key supplies you’ll need:
### Acrylic Paints:
* **Titanium White:** For highlights and mixing lighter tones.
* **Ivory Black:** For shadows and creating darker tones.
* **Burnt Umber:** A versatile brown for creating realistic skin tones and shadows.
* **Yellow Ochre:** Another essential for skin tones and adding warmth.
* **Cadmium Red:** For adding subtle redness to the inner corners of the eye and cheeks.
* **Ultramarine Blue:** For creating realistic iris colors and shadows.
* **Other Colors (Optional):** Depending on the desired eye color, you may also want to have colors like Viridian Green, Dioxazine Violet, or Quinacridone Magenta. High-quality acrylic paints offer better pigment saturation and blending capabilities, which is crucial for achieving realism when you paint an eye with acrylics. Student-grade paints are acceptable for practice, but professional-grade paints will give you superior results.
### Brushes:
* **Small Round Brush:** For fine details, such as eyelashes and highlights.
* **Small Flat Brush:** For applying base colors and creating smooth transitions.
* **Medium Round Brush:** For blending and creating soft edges.
* **Liner Brush:** For creating ultra-fine lines, especially for detailing the iris.
### Other Supplies:
* **Canvas or Painting Surface:** Choose a smooth surface for optimal results. A stretched canvas or a canvas board are both good options.
* **Palette:** For mixing your paints. A disposable palette or a wet palette is recommended.
* **Water Container:** For cleaning your brushes.
* **Paper Towels:** For wiping your brushes and cleaning up spills.
* **Easel (Optional):** For comfortable painting.
* **Reference Photo:** A high-quality reference photo is crucial for capturing accurate details.
* **Blending Medium (Optional):** To improve the blending capabilities of your acrylics. Using a blending medium can significantly aid in creating smooth transitions and subtle gradations of color, especially when learning how to paint an eye with acrylics.
## Step-by-Step Guide: How to Paint an Eye with Acrylics
Now that you have your materials ready, let’s dive into the step-by-step process of painting an eye with acrylics.
### Step 1: Sketching the Outline
Begin by sketching the basic shape of the eye onto your canvas. Pay close attention to the proportions and angles. Use a light pencil (like a 2H) to avoid leaving dark marks that are difficult to erase. The shape of the eye is not a perfect oval, but rather a more almond-like shape. The inner corner of the eye is usually lower than the outer corner. This initial sketch is the foundation of your painting, so take your time and ensure it’s accurate.
### Step 2: Blocking in the Base Colors
Next, block in the base colors for the sclera (white of the eye), iris, and surrounding skin. Use thinned-down acrylics (add a little water or blending medium) to create a smooth, even layer. For the sclera, don’t use pure white; instead, mix a small amount of yellow ochre or burnt umber to create a more natural, off-white color. The iris color will vary depending on your reference photo, but start with a mid-tone and build up the darker and lighter areas later. The surrounding skin will also require subtle color variations, so mix a base tone using yellow ochre, burnt umber, and titanium white.
### Step 3: Adding Shadows and Highlights to the Sclera
The sclera is not uniformly white; it has subtle shadows and highlights that give it dimension. Add shadows using a mix of ivory black and burnt umber, and highlights using titanium white. Pay attention to the curvature of the eyeball and how light interacts with it. The shadows will be more pronounced near the eyelids and in the corners of the eye. This is a crucial step in adding depth and realism to your painting.
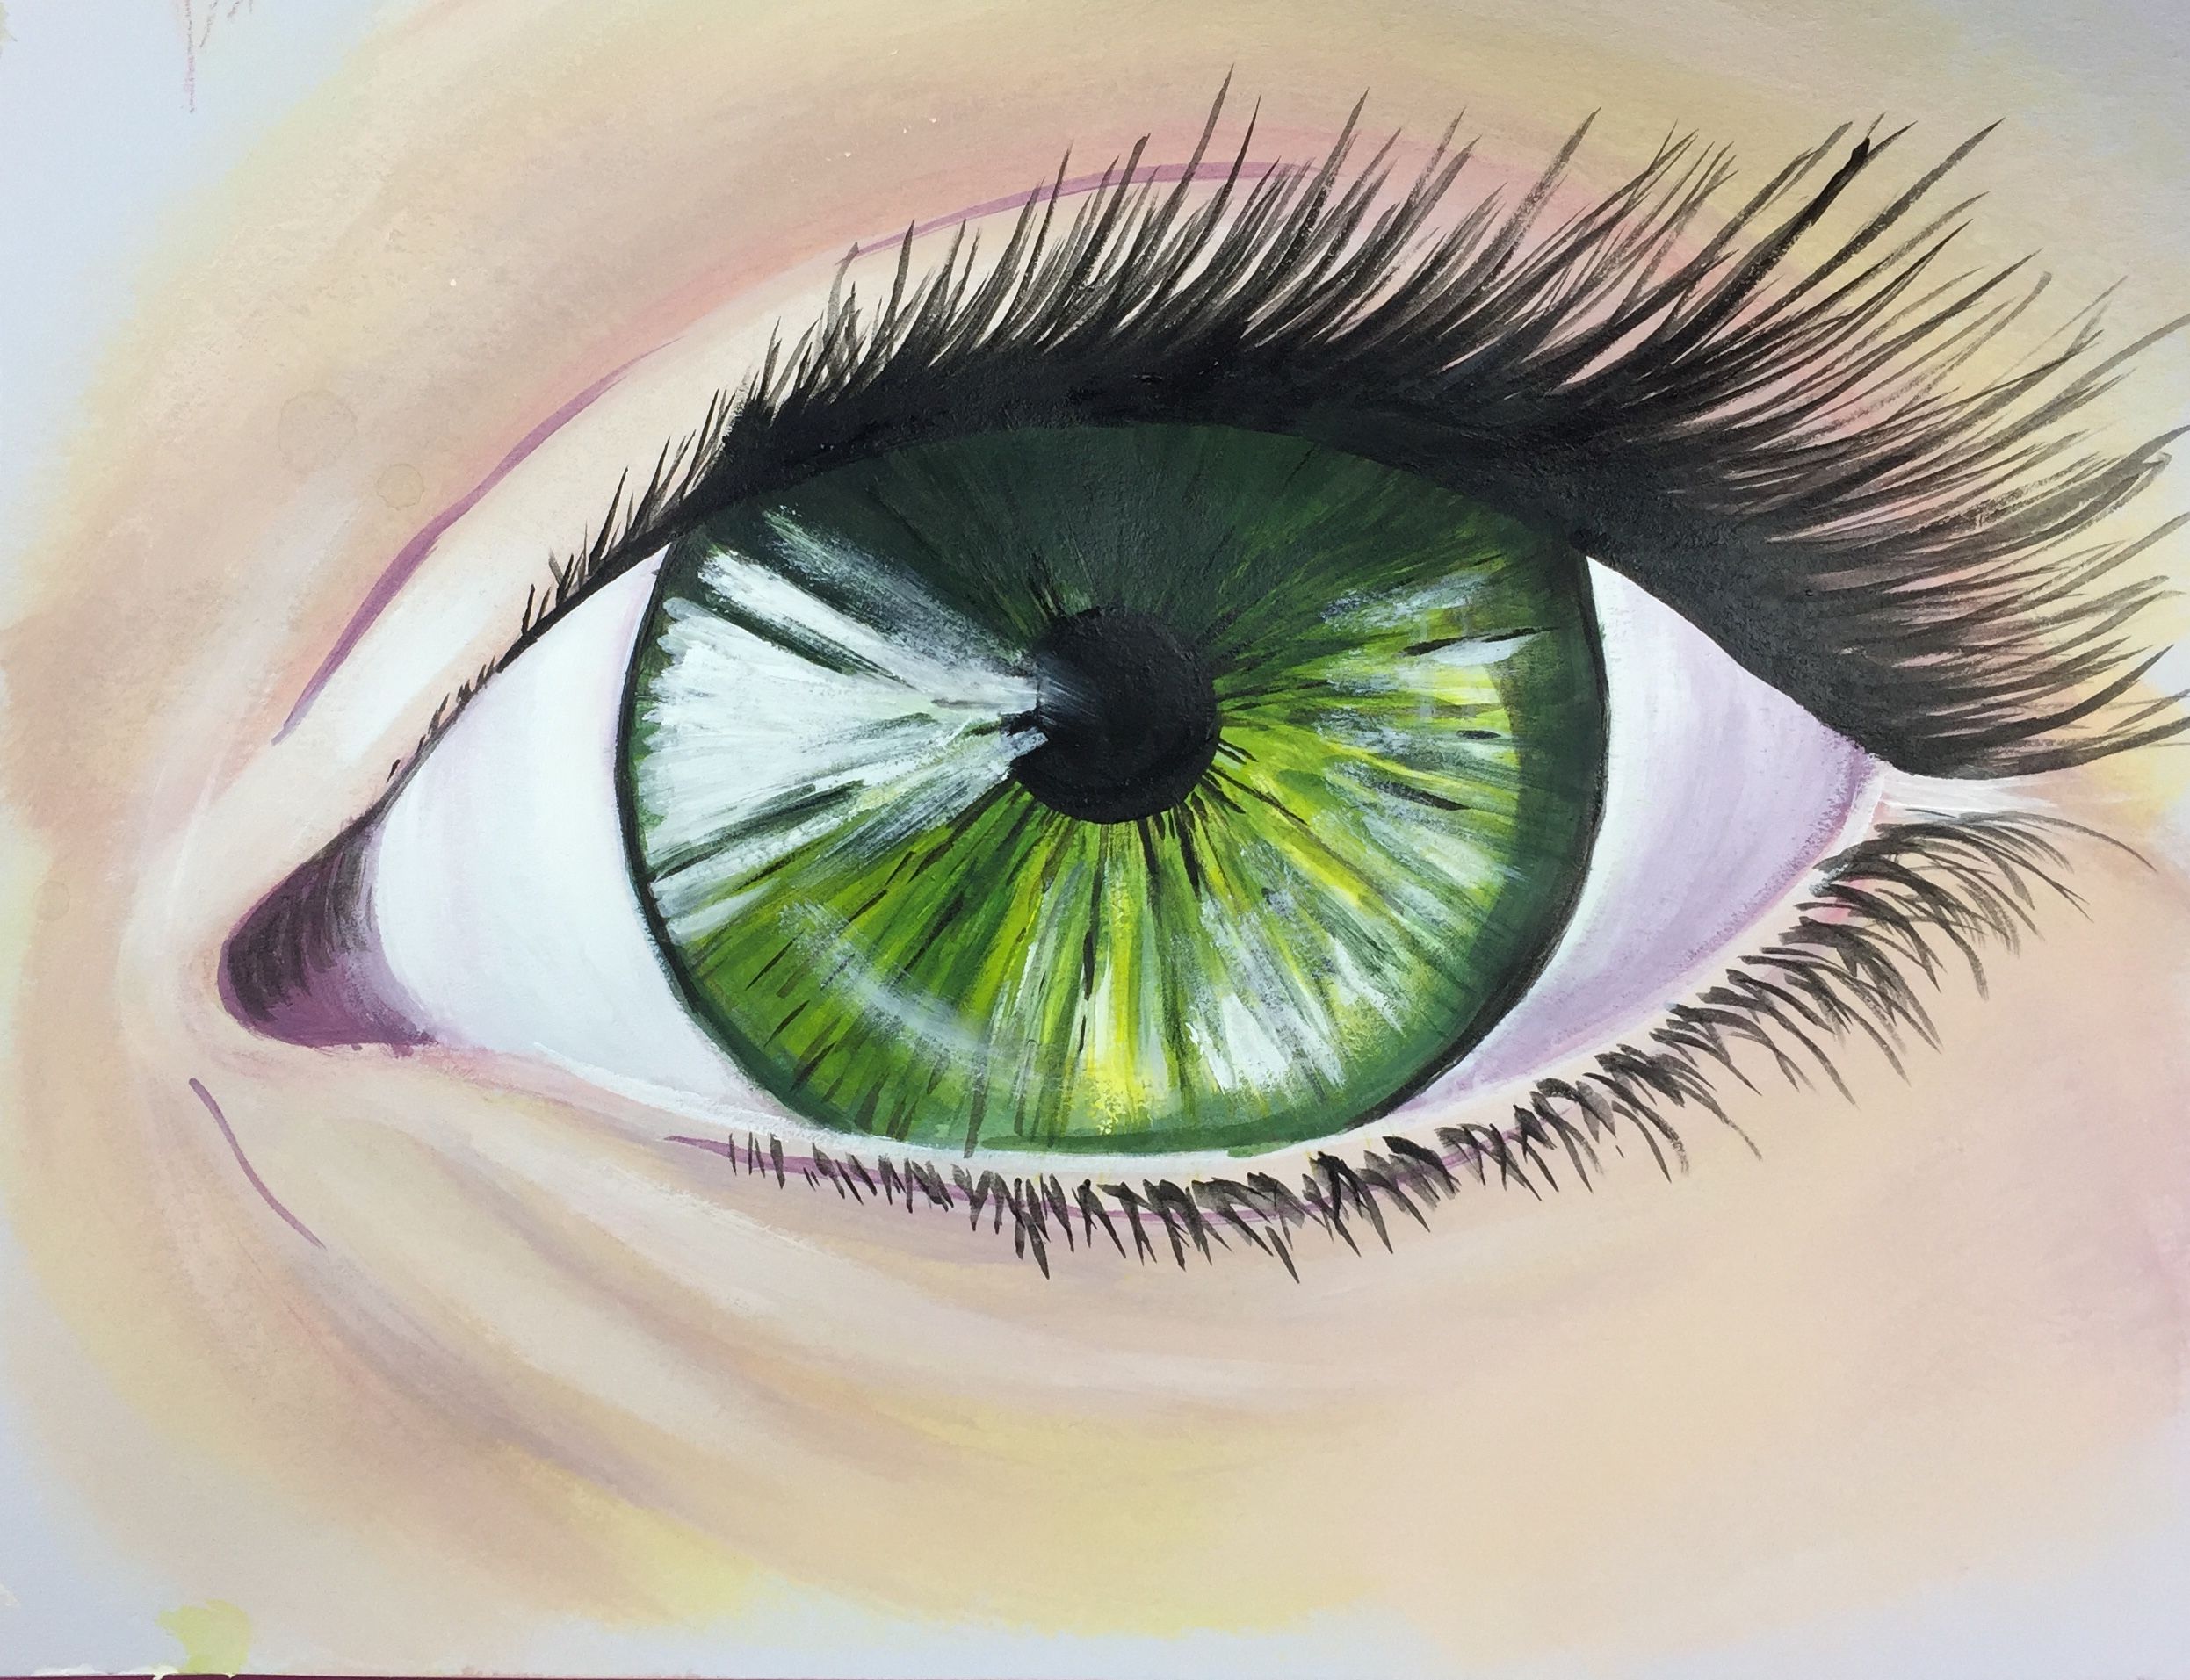
### Step 4: Painting the Iris
The iris is where you can really bring the eye to life. Start by adding the darker areas around the pupil and the outer edge of the iris. Use a small round brush to create intricate details and patterns within the iris. These patterns are often radial, emanating from the pupil outwards. Add lighter areas to create highlights and dimension. Use a liner brush to add fine lines and details that mimic the texture of the iris. Remember to refer to your reference photo frequently to capture the unique characteristics of the eye you’re painting.
### Step 5: Defining the Pupil
The pupil is the darkest part of the eye and should be painted with a deep, rich black. Use ivory black and add a tiny amount of ultramarine blue to deepen the color. The pupil is not perfectly black; it has subtle variations in tone that can be captured by adding a hint of other colors. Be careful not to make the pupil too large or too small, as this can affect the overall realism of the eye.
### Step 6: Painting the Eyelids and Eyelashes
The eyelids and eyelashes frame the eye and add to its expressiveness. Use a small flat brush to paint the eyelids, paying attention to the shape and thickness. Add shadows and highlights to give them dimension. For the eyelashes, use a small round brush or a liner brush to create fine, individual hairs. Eyelashes are not perfectly straight; they curve and taper towards the ends. They also tend to clump together in small groups. The direction and length of the eyelashes can significantly impact the overall look of the eye, so pay close attention to these details.
### Step 7: Adding Highlights and Reflections
Highlights and reflections are essential for creating a sense of realism and depth. Add a small highlight to the pupil and iris, using titanium white. The highlight should be placed strategically to mimic the reflection of light. You can also add subtle reflections of the surrounding environment to the iris. These details can make the eye appear more lifelike and captivating. The placement and intensity of the highlights can dramatically affect the mood and expression of the eye.
### Step 8: Blending and Refining
Once you’ve added all the details, take a step back and assess your painting. Use a medium round brush to blend the colors and soften any harsh edges. Refine the details and make any necessary adjustments. Pay attention to the overall balance and harmony of the painting. This is the final stage where you can fine-tune your work and bring it to its full potential.
## Advanced Techniques for Painting Realistic Eyes
Once you’ve mastered the basic steps, you can explore advanced techniques to further enhance your eye paintings.
### Glazing:
Glazing involves applying thin, transparent layers of paint over existing layers. This technique can be used to add depth, color, and subtle variations to the eye. Use a blending medium to thin your acrylics and apply the glazes in thin, even layers. Allow each layer to dry completely before applying the next.
### Dry Brushing:
Dry brushing involves using a dry brush with a small amount of paint to create texture and highlights. This technique is particularly useful for adding fine details to the iris and eyelashes. Use a stiff-bristled brush and wipe off most of the paint before applying it to the canvas.
### Color Mixing:
Mastering color mixing is essential for creating realistic skin tones and eye colors. Experiment with different color combinations and keep a record of your mixes. Pay attention to the subtle variations in color and how they contribute to the overall realism of the painting. Understanding color theory and how colors interact with each other is crucial for achieving accurate and lifelike results.
### Understanding Light and Shadow:
Understanding how light and shadow interact with the eye is crucial for creating a sense of depth and dimension. Pay attention to the direction of the light source and how it affects the shadows and highlights on the eye. Use a variety of values (lightness and darkness) to create a sense of form. Observing real eyes in different lighting conditions can provide valuable insights into how light and shadow work.
## The Role of Blending Mediums in Acrylic Eye Painting
Blending mediums are invaluable tools when you paint an eye with acrylics, particularly for achieving smooth transitions and subtle gradations of color. They extend the open time of acrylics, allowing you more time to blend and manipulate the paint before it dries. This is especially important when working on the intricate details of the eye.
### Types of Blending Mediums:
* **Acrylic Retarder:** Slows down the drying time of acrylics.
* **Flow Improver:** Reduces the surface tension of acrylics, making them flow more smoothly.
* **Glazing Medium:** Creates transparent glazes for adding depth and color.
### Benefits of Using Blending Mediums:
* **Improved Blending:** Allows for smoother transitions between colors.
* **Increased Open Time:** Gives you more time to work with the paint.
* **Enhanced Detail:** Makes it easier to create fine details and intricate patterns.
* **Reduced Brushstrokes:** Minimizes the appearance of brushstrokes for a smoother finish.
## Advantages of Acrylics for Eye Painting
Acrylic paints are an excellent choice for painting eyes due to their versatility, durability, and fast-drying time. They offer several advantages over other painting mediums:
* **Fast Drying Time:** Acrylics dry quickly, allowing you to work in layers and build up details efficiently. This is particularly useful when you paint an eye with acrylics, as it allows you to quickly correct mistakes and add details without waiting for long drying times.
* **Versatility:** Acrylics can be used on a variety of surfaces, including canvas, paper, and wood. They can also be thinned with water or blending mediums to create different effects.
* **Durability:** Acrylic paints are durable and resistant to fading, cracking, and yellowing. This ensures that your paintings will last for many years to come.
* **Easy to Clean Up:** Acrylic paints are water-based, making them easy to clean up with soap and water.
* **Opacity and Transparency:** Acrylics can be used both opaquely and transparently, allowing for a wide range of effects.
## Review: Liquitex BASICS Acrylic Paint Set for Eye Painting
The Liquitex BASICS Acrylic Paint Set is a popular choice for both beginner and intermediate artists. It offers a good balance of quality and affordability, making it a great option for those who are learning how to paint an eye with acrylics. While professional grade paints will offer richer pigment, these are a good starting point.
### User Experience & Usability:
The Liquitex BASICS paints are easy to use and blend well, making them ideal for creating smooth transitions and subtle gradations of color. The paints have a creamy consistency and a good flow, which makes them easy to apply to the canvas. The caps are easy to open and close, and the tubes are durable and resistant to leaks.
### Performance & Effectiveness:
The Liquitex BASICS paints perform well in terms of color mixing, blending, and layering. They offer good coverage and opacity, and they dry to a durable, water-resistant finish. The colors are vibrant and true to life, and they hold their intensity over time.
### Pros:
* **Affordable:** The Liquitex BASICS set is a great value for the price.
* **Easy to Use:** The paints are easy to blend and apply.
* **Good Color Selection:** The set includes a wide range of colors that are suitable for painting eyes.
* **Durable Finish:** The paints dry to a durable, water-resistant finish.
* **Versatile:** The paints can be used on a variety of surfaces.
### Cons/Limitations:
* **Pigment Load:** The pigment load is not as high as professional-grade paints.
* **Blending Time:** The paints dry relatively quickly, which can make blending challenging.
* **Color Mixing:** Some colors may require more effort to mix accurately.
### Ideal User Profile:
The Liquitex BASICS Acrylic Paint Set is best suited for beginner and intermediate artists who are looking for an affordable and easy-to-use paint set. It’s a great option for those who are learning how to paint an eye with acrylics and want to experiment with different techniques and colors.
### Key Alternatives:
* **Golden Artist Colors Fluid Acrylics:** A professional-grade acrylic paint set with a higher pigment load and smoother consistency.
* **Winsor & Newton Galeria Acrylics:** A mid-range acrylic paint set that offers a good balance of quality and affordability.
### Expert Overall Verdict & Recommendation:
The Liquitex BASICS Acrylic Paint Set is a solid choice for artists starting their journey learning how to paint an eye with acrylics. While it may not offer the same level of performance as professional-grade paints, it provides a good balance of quality, affordability, and ease of use. We recommend this set for beginner and intermediate artists who are looking for a reliable and versatile acrylic paint set.
## Q&A: Mastering the Art of Eye Painting with Acrylics
Here are some frequently asked questions about painting eyes with acrylics:
**Q1: What is the best type of brush to use for painting eyelashes?**
A: A liner brush or a small round brush with a fine tip is ideal for painting eyelashes. These brushes allow you to create thin, precise lines that mimic the natural appearance of eyelashes.
**Q2: How do I prevent my acrylic paints from drying too quickly?**
A: You can prevent your acrylic paints from drying too quickly by using a blending medium or acrylic retarder. These mediums slow down the drying time of acrylics, giving you more time to blend and manipulate the paint.
**Q3: What is the best way to create realistic skin tones?**
A: Realistic skin tones can be created by mixing a combination of yellow ochre, burnt umber, titanium white, and cadmium red. Experiment with different ratios to achieve the desired skin tone.
**Q4: How do I add depth to the iris of the eye?**
A: You can add depth to the iris by layering different colors and values. Start with a mid-tone and gradually build up the darker and lighter areas. Use a small round brush to create intricate details and patterns within the iris.
**Q5: What is the best way to create highlights in the eye?**
A: Highlights in the eye can be created by adding a small amount of titanium white to the pupil and iris. The highlight should be placed strategically to mimic the reflection of light.
**Q6: How do I prevent my paint from cracking?**
A: Avoid applying thick layers of paint all at once. Instead, apply thin layers and allow each layer to dry completely before applying the next. Using a good quality gesso primer can also help prevent cracking.
**Q7: What is the best surface to paint on when painting eyes with acrylics?**
A: A smooth surface, such as a stretched canvas or a canvas board, is recommended for painting eyes with acrylics. A smooth surface allows for better blending and detail.
**Q8: How can I avoid my white paint looking chalky?**
A: Avoid using pure white straight from the tube. Mix a small amount of another color, like yellow ochre or burnt umber, to create a more natural, off-white color.
**Q9: How important is the reference photo when learning how to paint an eye with acrylics?**
A: Reference photos are extremely important. A high-quality reference photo is crucial for capturing accurate details and proportions. Choose a photo with good lighting and clear details.
**Q10: What if I make a mistake while painting?**
A: One of the great things about acrylics is that you can easily paint over mistakes once the paint has dried. Simply apply a fresh layer of paint over the mistake and continue painting.
## Conclusion: Mastering the Gaze
Learning how to paint an eye with acrylics is a rewarding journey that combines technical skill with artistic expression. By understanding the anatomy of the eye, mastering essential techniques, and experimenting with different materials, you can create stunningly realistic and expressive portraits. Remember to practice regularly, refer to high-quality reference photos, and embrace the challenges that come with the process. The ability to capture the essence of the human eye is a testament to your artistic skill and dedication.
Now that you’ve learned the fundamentals, we encourage you to share your own experiences and tips on how to paint an eye with acrylics in the comments below. Explore our advanced guide to portrait painting for further insights and techniques. Contact our experts for a personalized consultation on how to elevate your art to the next level. Happy painting!
